Страницы

четверг, 10 ноября 2022 г.

The Factors to Consider When Choosing an Outdoor Kitchen Faucet

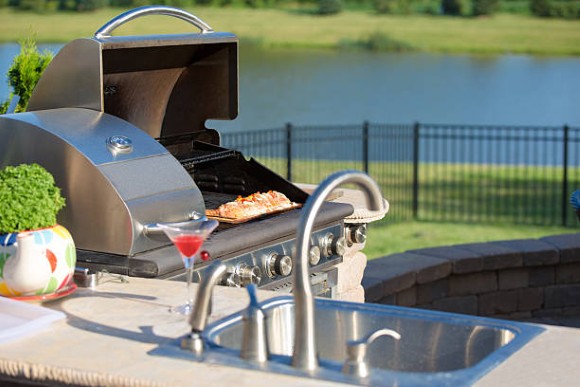
If you're thinking of installing an outdoor kitchen, you're going to need a kitchen faucet. But which one to choose? In this post, we'll outline the different factors you need to consider when selecting a kitchen faucet, and provide you with a few tips to help you choose the right one.

So whether you're looking for a budget-friendly option or something that will stand the test of time, read on to find the perfect outdoor kitchen faucet for your needs.

Tips for Choosing an Outdoor Kitchen Faucet

Choosing a kitchen faucet requires careful consideration of the following factors:

What is Your Budget?

Budget is the first and most important factor to take into account when choosing a kitchen faucet. Not all outdoor kitchen faucets are created equal, and some will be more expensive than others. So before making any decisions, make sure to estimate how much money you're willing to spend on a new kitchen faucet.

What Features Do You Need?

The features of a kitchen faucet vary depending on what you're looking for. For example, some outdoor kitchen faucets come with rain guards to keep your deck or patio clean and dry during heavy rainfall, while others may have built-in water filters to reduce chlorine and other contaminants. So before making a purchase, be sure to read the details of each option carefully so that you can choose the perfect one for your needs.

Decide On Your Cooking Needs

The type of cooking you will be performing is also an important consideration when selecting a kitchen faucet. If you have plans to cook outdoors often, for example, you may want to invest in an outdoor kitchen faucet that can withstand high temperatures and heavy use. Alternatively, if your primary concern is hygiene rather than performance, some budget-friendly options available on the market come with built-in water filters and chlorination inhibitors.

Design of your outdoor kitchen

In order to select the right kitchen faucet for your outdoor kitchen, you should also take into consideration the design of the outdoor kitchen when making your selection. If you prefer an elegant and contemporary look, or if you prefer a more traditional look, you have plenty of options to choose from.

Some stylish options available on the market come with a sleek chrome construction, while others opt for classic brass finishes. So before making any decisions, take time to assess your own personal preferences and find the perfect outdoor kitchen faucet for your needs.

Know Your Space

The size and placement of the kitchen faucet should also be taken into consideration. Make sure to measure the space where you plan on placing your new faucet in order to ensure that it will fit properly. Be sure to take into consideration the height of your existing fixtures, as some taller options may not be compatible with lower-pitched spouts.

Functionality & Durability

When selecting a kitchen faucet, it is also important to consider its functionality and durability. Some of the more affordable options available on the market are designed for quick and easy installation, while others come with more features and robust construction. And of course, all kitchen faucets need to be able to withstand frequent use in order to give you years of service.

Conclusion

Choosing the right kitchen faucet can make your outdoor kitchen feel like a high-end establishment. However, it's not just about aesthetics and luxury. You also need to ensure that your faucet has all the key features such as durability and safe operation before making a purchase.

How to Install Bathroom Shower: A DIY Guide

Shower installation can be a daunting task if you're not familiar with the process. In this DIY guide, we'll show you how to install a bathroom shower in just a few easy steps. Whether you're a first-time homeowner or just looking to upgrade your bathroom, this guide will have everything you need to get the job done right. Let us help you get started.

Bathroom Shower Installation

Before installing a bathroom shower, you will need to follow the following steps:

Prepping the Area

Before you can start installing your bathroom shower, you'll first need to prepare the area. Remove any clutter and make sure the floor is clean and free of any bumps or obstacles that might get in the way of installation.

Assuming you're installing your shower on a tiles or brick surface, it is necessary to first measure and mark the area where the shower pan will be installed. Standard shower pans are generally 24 inches wide by 36 inches long. Make sure to allow a 12-inch overhang on each side of the pan for drainage and safety reasons.

Next, mark out the measurements of your tiles or pavers using a level or straight edge. It is also important to determine how and where your shower head is going to be mounted as well as the route for the drain.

Installing the Shower Base

To install the shower base, start by installing the shower pan. Fit the pan into place and make sure it's level before securing it with screws or tile adhesive. Once you've installed the shower pan, start laying out your tiles or pavers.

You should ensure that each tile is centered precisely and that the tile adheres properly to the adhesive with a wet sponge. When you're finished, sand any irregularities off of your tiles or pavers before grouting them in place using a grout gun and mortar mix.

Installing the Shower Pipes

The shower base is now installed, and the next step is to start installing the pipes for the shower. Start by locating and cutting your pipe joints using a hacksaw or jigsaw. Once you've cut the joints, fit each piece of pipe into place and tighten the screws or tile adhesive until they're secure.

Next, route your drain tubing through both side of the shower pan and connect it to your taps or faucets. Finally, attach any necessary brackets or knobs before grouting them in place using a grout gun and mortar mix.

Finishing Touches

Once you've finished installing your shower, you should add some finishing touches to make the room look complete. First, paint or seal any unfinished areas around the pipes and joints with a coat of drywall compound or latex paint.

Then, add a sleek contemporary fixture such as Celtic faucets, rainhead spouts, or porcelain tiles. You are now ready to take advantage of the benefits of a relaxing bath after installing your new shower.

Conclusion

As a conclusion, installing a new shower is an easy task that can be completed by anyone with some basic DIY knowledge. Be sure to follow the instructions provided in this article carefully, and you'll have a perfect installation at hand in no time.


5 Simple Steps to Cleaning Solder from Copper Pipe

When it comes to cleaning solder from copper pipes, it can be a difficult and time-consuming process. However, it is important to remove all solder from the pipe before starting any plumbing repairs. Otherwise, the new solder will not adhere properly and could cause leaks. The purpose of this article is to provide a few simple instructions on how to remove solder from copper pipes.

Why Should I Remove Solder from Copper Pipes?

Solder should be removed from copper pipes for two reasons. First, if there is any existing damage to the pipe, it is important to remove all of the old solder before applying new solder. This will ensure that the new solder adheres properly and does not leak. Second, even if there is no damage to the pipe, removing the old solder will make it easier to apply new solder.When you want to discover further more information about plumbing, you've to browse around https://plumbingtechie.com website.

How to Clean Solder From Copper Pipes

Here's what you'll need to clean solder from copper pipes:

  • A soldering torch
  • A putty knife
  • A wire brush
  • Sandpaper
  • Vinegar
  • Rubbing alcohol
  • A clean rag

To remove solder from copper pipes, here are 5 steps:

Step 1: Cut the Pipe

First, you will need to cut the pipe at the point where you want to remove the solder. You can use a hacksaw, a tubing cutter, or a rotary tool with a cutting disc. It is also a good idea to protect your eyes when working with power tools by wearing safety goggles.

Step 2: Heat the Pipe

Next, use your soldering torch to heat the pipe at the cut you made in step one. Keeps the flame moving so that you evenly heat the entire circumference of the pipe. You will know the pipe is hot enough when the solder starts to melt and run.

Step 3:  Remove the Solder

Once the solder has melted, use your putty knife to scrape it away. Start at the top of the pipe and work your way down. Be sure to hold the pipe with a cloth or gloves so you don’t burn yourself. Make sure you have a bowl of water nearby in case the solder drips.

Step 4: Clean the Pipe

Once all of the solder has been removed, use your wire brush to clean the inside of the pipe. This will remove any residue that is left behind. Next, use sandpaper to smooth out the inside of the pipe.

Step 5: Disinfect the Pipe

Finally, it is important to disinfect the pipe before using it again. This will help to prevent any bacteria or mold from growing inside the pipe. To do this, mix equal parts vinegar and water, or rubbing alcohol and water. Then, use a clean rag to wipe down the inside of the pipe.

Conclusion

Soldering is an important part of many DIY and home improvement projects, but it can be tricky to get the solder off the copper pipe when you’re finished. These five simple steps will help clean the solder from the pipe quickly and easily, so you can move on to your next project. Have you tried these tips for cleaning solder from copper pipe? What tricks do you use to make this process easier? Share your tips in the comments below.